

To open the Import Window, go to File > Import or press ⌘I (command+I).
The Import Window is divided into three different panes:
- File Pool: in the middle
- Metadata: down the left side
- Audio Editor: across the bottom
Think of The Import Window as an app/project within ADD. Adding audio files to the File Pool creates an “Import Project” that can be saved, closed, and opened at a later date to finish tagging and importing. Both the Metadata and Audio Editor panes can be open/closed for your viewing preferences.
💡*This is important when choosing between functions such as “Save Project” and “Save Edits”
Import Window Menus
The Import Window contains its own Menu Bar to make the various functions as accessible as possible. This section will give you a brief understanding of each function. An in-depth exploration of the functions can be found in the Importing Audio section.
File: Similar to the ADD File Menu, this is where you can access functions such as saving, opening, and exporting.

- Save Project/Project As: Saves the metadata edits and additions to the project file but does not save the metadata edits to the audio files. Save as allows you to duplicate the project or save it under a different name.
- Close Project: Closes the current Import Project.
- Save All/Selected Metadata Edits: Save changed metadata information that you have added to your audio files. Save Selected only saves metadata edits on the selected audio files in the File Pool.
- Revert All Changes: Removes any edits made to the project and audio files.
- Import to your ADD Library (Shift-Cmd-I): Imports the selected audio files directly into your ADD library folder.
- Export Sound Pack (Cmd-B): Exports your current project as a sound pack that can be used in ADD. Sound Packs are generally a group of related sounds that you wish to be easily available for use. Sound Packs can be sold or offered in the Audio Design Desk Sound Pack Marketplace.
- Rebuild Metadata Index: If you’re running into errors or have maybe many broad changes to metadata fields, it is recommended that you rebuild the Index.
- Export Elements (Opt-Cmd-B): If you simply wish to convert stems into elements, once you have added your element markers (described below) you can export elements to your desired location. These elements can then be used in ADD.
Convert Files
If you wish to convert your files, your options are:
- File format: .WAV, .AIF, .CAF, .M4A, .addAudio
- Sampling Rate: From 44,100 up to 192,000
- Bit Depth: 16, 24, and 32
Once you have set the parameters of the conversion, select the location you would like the files to save to and click “Convert”.
Edit
This menu gives you selected control over the audio files in the Import Window.

- Cut ⌘X (Cmd+X): Remove an audio file from the Import Window.
- Paste Attributes ⌥V (Opt+V): If you wish to copy the metadata from one file and paste it onto another, simply copy the file that has the metadata you’d like to paste and “Paste Attributes” to selected files by using this command. The below dialogue will appear where you can select which metadata you would like to paste. Once you’ve made your selection, press “OK” and the selected metadata will be pasted to your selected files.

- Delete/Remove All: Removes the selected files from the File Pool. Removes All deletes all files from the File Pool regardless of what’s selected.
- Select Next/Previous: Selects the next (under) or previous (above) audio file in the File Pool.
- Rename Folder: Allows you to change the name of the current Folder of files you are working on within the File Pool. More info on Folders below.
- Delete Folder: Delete’s the current Folder your are working in.
- Select Next/Previous Folder: Moves you to the next (right) or previous (left) folder within the File Pool.
- Show Spelling and Grammar ⌘:(Cmd+:): Conducts a search of all metadata edits pointing out any possible spelling mistakes and/or grammatical errors.
💡*It is highly recommended that you search your audio files for any spelling errors in the metadata since searching and replacing is reliant on clean metadata
View
The View Menu allows you to open/close the Metadata and Audio Editor panes when working in The Importer. You can also select to make The Importer full screen.

Tools
The Tools Menu provides access to a variety of helpful tools to make tagging your files quick and easy!

Batch
Here you have batch processing controls for slicing and converting files.

Guess
ADD can guess several Metadata fields greatly expediting the import and tagging process. In our tests, the importer guesses this correctly around 80% of the time so it’s important to check this and correct it where you see inaccuracies. All guesses applied will be to the selected audio files within the selected folder in the File Pool. If no files are selected, it will guess for all files.

- All Metadata ⇧⌘G (Shift+Cmd+G): Have ADD guess all metadata (category, type, bpm, etc.) for all the selected audio files in the File Pool. More information can be found below in Metadata Tagging.
- Categorization Metadata: Have ADD guess only the category/type metadata for all selected audio files under the selected folder in the File Pool.
- Sync Markers ⌥⇧⌘G (Opt+Shift+Cmd-G): Have ADD guess the Sync Marker(s) for all audio files under the selected folder in the File Pool.
- BPM: Have ADD guess the BPM for all audio files under the selected folder in the File Pool.
Keywords
When working with larger import projects, changing keywords on individual files can get tedious. ADD has a few options to help quickly adjust keywords on all of your sounds. All changes applied will be to the selected audio files within the selected folder in the File Pool. If no files are selected, it will apply the changes to all files.


- Find and Replace Keyword: Finds all instances of a keyword and allows you to replace all instances with an already used keyword or a new one that you type in.
- Sort Keywords: Alphabetizes all keywords in the Keywords metadata field.
- Title to Keywords: Adds the words used in the title as individual keywords.
- Remove All Keywords: Strips all audio files of keywords.
- Check Spelling in Keywords: Spell-checks all of your keywords.
💡*It is highly recommended that you search your keywords for any spelling errors in the metadata since searching and replacing is reliant on clean metadata
Replace Metadata Field ⌥⌘R (Opt+Cmd+R): Here, you can select a specific field of Metadata and replace one field with another.

Remove All Metadata ⌥⌘Delete (Opt+Cmd+Delete): Strips all metadata from the selected audio files within a folder in the File Pool. If no files are selected, it will remove metadata from all files.
Remove All Markers ⌥⇧⌘Delete (Opt+Shift+Cmd+Delete): Strips all Sync and Element Markers from all selected files within a folder in the File Pool. If no files are selected, it will remove these markers from all files.
Analyze Loudness: Quickly measure your files’ loudness in LUFs and save that information as metadata. Audio Design Desk can use this info to automatically balance your audio levels in a project using the Auto-gain feature.
Importing Audio
After reading through and understanding the basic features and commands above, you can now start to import your own sounds and libraries. When importing audio from an external drive, the audio files will be copied and saved within your library.
Adding Audio Files
To get started, drag files or folders from the Finder into the ADD Tags Import WindowImporter Folders

To remove files, select the files and press Delete. You can select multiple files at once. If you are importing multiple categories of audio files or would like to maintain the folder structure files are currently located in, we recommend that you create separate Folders for your audio files. You can create a new folder by clicking the + (Plus) icon at the top left of the File Pool.

Now you can add specific sounds to the folders better assisting ADD when trying to guess the metadata on all files. Or if you have already dragged in files before creating a folder, you can create a folder and move sounds to it by; selecting the sounds, right-clicking and selecting ‘New Folder with Selection‘.

💡*Our categories are Ambience, Footsteps, Foley, Sound Design, Sound Effects and Music.
Metadata Tagging
Once sounds are placed in the Import Window, you can tag the sounds using the metadata panel. While it is not mandatory to have this information in your files, the more metadata you have on each sound, the better ADD will be able to find the sounds using “Search” criteria and the better ADD will be able to create replacement compositions for you.
Sounds can be edited individually or in batches by selecting multiple sounds before making edits in the Metadata Pane. Below is an example of a sound that has been well-tagged. Notice that since this is not a musical file, we’ve chosen not to include Key, BPM or other attributes that aren’t needed. Be sure to enter the most relevant info to get the best results from Search and Replace.

Guess Metadata
ADD can guess the metadata for all files in the import window. ADD first looks for any existing metadata in your file as well as the file name and folder structure. If your files have no metadata, taking a moment to organize the files on your drive can really help the importer with its ability to accurately guess your metadata. This is why we recommend creating folders within the importer before dragging audio files in.
To have ADD guess metadata, first select the sound(s) you want to add metadata, too. Now select “Guess All Metadata” from the Metadata drop down menu, or by pressing ⇧⌘G (Shift+Cmd+G), or by clicking the “Guess all metadata” button at the bottom of the metadata window.

ADD will scan through all of the sounds and apply all metadata it finds that matches. Even if there are mistakes, once you’ve corrected them, ADD will adapt and remember those corrections the next time you import sounds. This way ADD will get more metadata and more correct every time you import sounds. You can also continue to manually add metadata that the sounds share, like Keywords, Genre, Mood, etc.

💡*In our tests, the importer correctly guesses around 80% of applicable (not subjective) metadata. So it’s important to check for inaccuracies and make corrections where needed.
Manually adding Metadata
Now that you’ve got a start tagging your sounds using Guess Metadata, or maybe you decided not to have ADD guess, you can finish cleaning and tagging sounds by hand. Some categories are fairly subjective (intensity, complexity, title) and ADD won’t be able to guess metadata for them. There will always be some sort of manual tagging even after ADD guesses metadata. If you are uncertain of what to select for your sound(s), don’t worry. Select what you know and ADD will adapt.

Start at the top of the Metadata Panel and work your way down. Check:
- Title
- Category
- Sub Category
- Type
- Sub Type
Since these are often guessed, you will most likely be checking ADD’s work. If there are any corrections to be made, click the drop down arrow in that field and select the proper tag.
If you do not see the correct tag in the drop down menu, you can type your own tag into the field. We recommend sticking to the tags available in the drop down menu to make sure the sound is properly categorized with other ADD sound packs.
The next section tends to apply more to Music or Sound Design but can still have relative fields for any sounds.

Let’s start with:
- Album
- Composer
- Publisher
- Genre
Most of this metadata will be guessed by ADD based on the existing metadata on the file. But it’s always important to double-check and make sure there aren’t any unnecessary special characters included in the fields.
🚨 Some fields need to be entered manually:
- Related Genres
- Moods
Use the drop down menus to select all that apply to the current selection of files.

Next let’s tag:
- Intensity Slider — How powerful the sound(s) is.
- Complexity Slider — How many layers (instruments) are present and how much movement is in the sound(s).

While it’s easier to see how these tags apply to music, they’re very helpful tags to apply to sound effects and foley as well. The Intensity slider sets the difference between a Pea-Shooter and Shotgun. Or a Tip-Toe vs a Stomp. The Complexity slider is one person walking vs the sound of an entire army walking in unison.
These tags are completely subjective and will never be guessed. Once you start to familiarize yourself with the ADD Library it will be easy to hear and assign these tags to your own sounds.
When relevant, then we’ll tag:
- Instrument – Only used when working with single instrument stems/loops
- Tonic – The Key of the piece
- Modality – If the piece is major, minor, other.
- Section– If the piece is part of a larger piece
- BPM
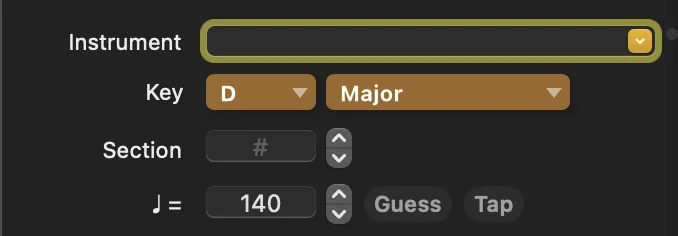
While these tags are generally important, they are especially important if you want the music file to time-stretch to match global bpm or pitch-shift to match global key.
Finally we need to tag Keywords. If you would like to create custom keywords, simply type them into the box below and separate with a comma. Hidden Keywords are words that will work with search but won’t appear as visible Keywords in ADD.

Sync/Element Markers
Now that we’ve tagged the metadata, we need to add Element Markers to all of our Stems and Syncs Markers to all of our sounds. And the Audio Editor is where you can add and edit those markers on individual regions. You can do so by going to the Markers dropdown menu.

The Importer Audio Editor operates the same as the Region Editor located under the ADD Timeline Window. To see more information on all the functions within see Region Editor. But for this example we’re going to show you how to use this window to quickly create Element and Sync Markers for your sounds.
Element Markers
When working with files such as footsteps that are usually recorded as stems, breaking those stems into individual elements will save you tons of time not have to manually cut and sync those elements. You can quickly break stems in elements and apply sync markers using the Element Detector.

Element Detector
To open the Element Detector, select a sound (we’re using a Footsteps stem as an example) and go to the Markers drop down menu in the Audio Editor.

Once opened you will see several settings that can be adjusted to fine-tune how ADD detects elements and sync markers. Click the “Add Element Markers” checkbox. Above the audio file in the Audio Editor, the Footsteps stem now has Element Markers placed around the boundaries of the individual footsteps. Now that our Footsteps are broken into elements, we want to add Sync Markers to all of those individual elements. We can also add Sync Markers from the Element Detector. Click the “Add Sync Markers” checkbox. Each Footstep should now have its own Sync Marker. You can see the Sync Markers placed in between the Element Markers. Now that we have our makers, go back to the bottom of the Element Detector and click “Save”. The individual elements in your audio file should now have vertical perforated lines separating them and indicating that they are saved.
💡*Lossless Boundaries are for Apple Lossless Audio files when exporting.

These Element Marker boundaries can be adjusted by using the sliders in the Element Detector.
- Minimum Duration – The shortest an element can be to exist
- Threshold – How loud the sound needs to be to identified as an element. Adjust for quiet sounds
- Pre-Attack Time – How much time is between the start of the Element Marker and the start of the sound
- Post-Release Time – How much time is between the end of the sound and the end of the Element Marker
- Buffer Size – How much time is “forgiven” when adjusting the positions of the Element Markers in relation to the sound
This is the fastest way to create Element and Sync markers from stems. All markers can be added and placed manually (explained further below) as well as all markers can be manually freely dragged around the file. Just make sure that you’re saving your Metadata Edits to maintain marker positions.
💡*You can all click “Reset” or “Clear Markers” if you have made any mistakes or unwanted changes to the file or Element Detector.
Create Element Markers From Selection (U)
You cam manually create Element Markers by click-dragging across the area in the audio file. Then press (U) and colored brackets will appear above your selected section. You can now freely move these Element Markers to the preferred position. Once in the correct place, go to the File drop down menu and click “Save”. Vertical perforated lines will appear on your audio file. These lines are the elements of an audio file and how your file will be separated when imported.

Also, Element Markers don’t just have to be for stems. Music files can use element markers when trying to split a long music cue into several shorter sections of music.

The example above shows a music cue being split into three sections. A short moody intro, a moment of tension, and an excited rhythmic ending.
Sync Markers
Maybe your sounds don’t need to be broken up into individual elements or you manually created element markers so now you need to add sync markers.

Guess Sync Marker
As with Metadata and Element Markers we recommend starting by having ADD guess the Sync Markers for your files. You can do so by selecting files and clicking “Guess Sync Markers” at the bottom of the Metadata Editor Window.

Or you if you want to guess on an individual file, click “Guess Sync Markers” in the Markers drop down menu in the Importer Audio Editor.

Manually add Sync Marker
To manually place a Sync Marker, move your cursor to the desired transient and click “Add Sync Marker” in the Markers drop down menu in the Audio Editor. Or press (M). The Sync marker will appear as a colored marker up top.

Remove Markers
If you have created undesired markers you can select them and press delete. Or you can remove all markers by going to the Markers drop down menu in the Audio Editor and selecting “Remove All Markers”.

Import to Library
Now that you have tagged your Metadata and set your Markers, you are ready to import your sounds to the library. “Import to Library” is recommended for batches of generally unrelated sounds. First, let’s “Save Edits” to make sure no edits are lost during transition.
Now click “Import To Library”. This will open the Import to Library Window where you have quite a few different options for importing.

At the top of the window it shows how many files that will be imported and the file path location of those imported files.
The first choice to makes is to choose if you want to:
- Copy – Create copies of the original files that now live in ADD.
- Move – This moves the files from the original location inside of ADD. This is a “destructive” change to the files.
Then you select remaining relevant options:
- Create CSV metadata summary on export: This will create a CSV spread sheet with a full summary of all sounds, metadata, and keywords tagged in the current import.
- Encode As .addAudio: Encodes all files to be .addAudio files which are preferred file types when working inside of ADD. This also prevents the files from being used by any other software other than ADD. This is necessary when exporting sound packs.
- Allow Bit Depth Upsampling: This allows you to convert 44,1k files to 48k and so on. Recommended to prevent any sort of distortion when importing files.
- Create Elements on Export: This will split all stems with element markers into individual elements. When not enabled, all stems import as stems with their element makers attached.
- Guess Sync Markers in Elements: If you created element makers but didn’t place Sync Markers, this allows ADD to search through all of the element markers and place Sync Markers during the import.
Now click “Import” and all of your sounds will import into ADD. You can find these sounds in the Latest Import folder in the Library Tab of the Library Window.
Export Elements as Clips Explained
Instead of importing several files or one larger file, you may just want to create elements from a single stem. Rather than create separate audio files you can create Clips from the elements. Clips are reference files that correspond with elements inside of your audio file. Even the audio file itself can be exported as Clip to preserve precious storage on your hard drive.
To create clips from elements, set your Sync and Element Markers, then go to the File dropdown menu in the Sound Editor and select “Save Elements as Clips”.

ADD will create a new playlist of those Element Clips. These clips can then be assigned to Triggers and used like other .addAudio files.

💡*This is beneficial in large projects as clips require a fraction of the space an individual audio region requires
Export as Sound Pack
Another export option is to create a custom sound pack. Sound packs are great for organizing similar sounds into the same folder to enable or disable on all future projects. Perfect for sounds recorded for a specific Film or Series. In the future you will be able to create and upload sound packs to give away or sell within the ADD marketplace. More information on uploading a sound pack to the marketplace can be found in Sound Pack Manager. To export a Sound Pack, click the Export Sound Pack button in the Import Window
Name the sound pack, and give it a description. You can also add an image to help identify the sound pack in the Sound Pack Manager. Now go through the import options as explained above in the Import to Library section.

Now click “Export” and your newly created sound pack will appear under sound packs in the Library Window and in the Sound Pack Manager. This is recommended if you’re importing a personal sound pack of several related sounds.