
This side bar area, called the Library Window, features 10 tabs. Clicking on the desired tab will open its sidebar so you can begin using it.
- Home
- Trigger Sets
- Trigger Pad
- Search
- Sound Packs
- Playlists
- Media Bridge
- Extensions
- Tutorials
This window can be closed/opened by pressing (⌘1). You can also dock/undock the window by pressing (⌥⌘1) or going to the View Menu and selecting “Docked Library“
Home
The Home side bar provides quick access to your projects, files, sound packs, extensions and common import/export options. You will also find links to your account, helpful tutorials and support on the ADD website.


“Projects & Files” is where your sounds, projects, exports, bounces, clips, and videos are stored.
- All Autosaved projects
- Your recent Bounces
- Any created Clip
- Project Exports
- All of your imported sounds under Library
- All saved Projects
- Any created Stacks
- All of your downloaded Stock Media from the Browse Tab
- All imported Videos used in saved projects
Trigger Sets
This is where you select sounds for custom trigger sets and the timeline! Use powerful search tools and filters to quickly find the sounds and music you need.


Trigger Pad
In this panel you send place sounds directly to the timeline by either clicking one of the trigger buttons, or typing the character of the trigger on your QWERTY keyboard. If you have a MIDI controller handy, you can use that to trigger sounds in ADD, too!

Search
Use this basic search panel to freely browse all available sounds and music in one location, without affecting any of your search settings on other tabs!

Search Option settings tell Audio Design Desk if you’d like to find sounds that have ANY of the keywords or ALL of the keywords in your search. This is a small but important feature that can affect your search results in big ways.

“Reset” clears the search browser.

You can refine your search using the “Intensity” and “Complexity” parameters.

- Intensity: How strong the sound(s) are.
- Complexity: How many layers the sound(s) have.
Click on the circles 1-5 correlating with how intense/complex you wish the sound(s) to be. Only sounds with the intensity/complexity rating you selected will appear in the search pool.
You can also search for sounds by clicking on the category button just to the left of the search field. These selections work like a flow chart opening other options for you to select based on what’s selected higher up the chain.

Source buttons decides where Audio Design Desk is searching from (music, sound design or sound effects), and allows you to select specific sound packs to search from as well.

Once the Search Pool is loaded, select an audio file and press (Spacebar) to preview it. When you’re first using ADD, sounds will auto play when selected. This can be changed in the General Tab of the Preferences Menu by deselecting “Auto Play on Selection”. There are many features you can engage with in the preview player window.

If you (Double Click) on the file, the Region Editor will open.
To place the selected sound(s) in the timeline, click the sound(s) you want and press (⇧Return). If a sound in the timeline is already selected, this will replace the timeline sound with the search pool sound. Alternatively you can press (⌥⇧Return) to place a sound without replacing the selected sound.
Replacing One Sound With Another
There will be times when you place one type of sound and want to replace it with another type of sound. For example, you may place sneaker footsteps on concrete and then realize they should be heel footsteps. In those cases, replace comes in very handy.
- Select the region or regions to be replaced by clicking or shift clicking on them.
- Go to the “Search” or “Replace” tab.
- In the keyword browser, type “Footsteps, concrete, heels”.
- All the results will be displayed.
- Audition the footsteps with (Spacebar) and select the ones you like.
- (Right Click) and select “Send to Timeline” or press (⇧-Return).
- All the footsteps will be replaced with the new ones you selected.
Replace
Replace adjusts the way Audio Design Desk replaces sounds, based upon your input. You can use this panel to broaden or narrow replacement parameters, by region or in groups of regions. This is a very powerful way to quickly create entirely new soundscapes or affect subtle changes, it’s entirely up to you!

Find sounds by typing a keyword into the search bar or select keywords from the “Keywords” drop-down. Select “And/ Or” to indicate if you want results with all keywords in the search bar or with any keyword in the search bar. Or use the drop down menus to select commonly used keywords to easily replace sounds with new sounds in the right feel or genre.
Sound Packs
This is where you can browse and download various sound packs currently available from the Audio Design Desk store.

Our typical folder structure resembles our organizational hierarchy for the sound library at-large:
- Sub Category: Element (which is typically a single sound) and Stem (typically a longer region with multiple sounds).
- Type: describes the basics of the sound. For example, “Transportation” is a “Type”.
- Sub Type: gives more detail on the exact sound such as “Drive By Car”.
Organizing files in this way gives you the ability to quickly find sounds and helps you learn the general organization of sounds for future searching.
Playlists

ADD contains several pre-made playlists for you to add sounds to as well as gives you the ability to create and manager your own playlists. You can tell Audio Design Desk to only use sounds from a specific playlist, which is especially useful when you are working on multiple projects and have specific sonic identities for each.
Our list of pre-made playlists are:
- Blacklist: For sounds that you don’t want to appear in dynamic replace results at any point regardless of projects (Not every sound is perfect). If you (Right Click) on a sound, select “Add to Playlist”, then “Blacklist”, Audio Design Desk will know not to use that sound in the future.
- Clips: Where clips created in the Region Editor are stored. Clips are small reference files of audio files where edits and effects can be applied so you can take one sound and create alternates without bouncing new audio files. Clips can be assigned to triggers. You can search for your clips in this window, and all keywords are stored in the “Keywords” drop-down.
- Favorites: Where all of your favorite sounds are stored. (Right Click) on a file to favorite it or click the “Star” icon in the Sound Editor. Favorite sounds are more likely to appear in dynamic search results
- Latest Import: Where the most recent imported sounds appear. This is useful when you want to quickly import sounds and immediately find them or apply them to a trigger.
- Project Blacklist ( ⌥X ): For sounds that you don’t want to appear in dynamic replace results specifically in the project you are working in. Some sounds work great in one project but don’t fit another. If you (Right Click) on a sound, select “Add to Playlist”, then “Project Blacklist”, Audio Design Desk will know not to use that sound in your current project.
- Project Favorites ( ⌥F ): Where your favorite sounds within the open project are stored. This is especially useful with repeated sound design elements or when you’re auditioning music to video and want to quickly create a “Selects” folder.
- Session: Where you can find every sound and every rendered stack in your session. This is useful when you want to reuse specific sounds.
Custom Playlists

You can create custom playlists for your own sounds and sounds within ADD sound packs. To create a playlist, (Right-Click) “Your Playlists” and select “New Playlist”. Or press (⌥⌘N). There are also buttons at the Bottom of the Playlists panel you can use to create or remove Playlists and Groups.
To add a sound to a playlist, (Right-Click) on a sound in the library or in the timeline, select “Add to Playlist”, then select the name of your custom playlist. Or drag the sound from a pool into the playlist.
Media Bridge


The Media Bridge panel allows you to access any of your favorite stock media subscription services like Epidemic Sound, Soundstripe, Free Music Archives, Free Sound and countless more. Simply log into your account and download sounds/video directly into ADD, as well as collaborate with other creators and artists. With built-in browser capabilities, you’ll never need to leave Audio Design Desk to find the sounds and music you need. If you are working with another DAW or NLE in ADD through one of our powerful extensions, the media files involved can be managed here.
Extensions

Extensions allow you to connect Audio Design Desk to other Frame.io, as well as popular NLEs to maximize efficiency and accomplish things previously thought impossible. Sync your Frame.io account and work seamlessly with editing programs like Final Cut Pro, Adobe Premiere, and DaVinci Resolve in real-time! Import and export projects in seconds, make edits and even re-conform projects in an instant. ADD extensions make it all so easy! (ADD also works with all your favorite DAWs like Logic Pro, Ableton Live, Pro Tools, etc.)
Frame.io
If you are a Frame.io user, you can now use their service within Audio Design Desk so you never need to leave the ADD timeline to upload files, download files, create version stacks, or receive notes.
💡*If you are not a Frame.io user, contact us to receive 60 days of their service for free at [email protected].
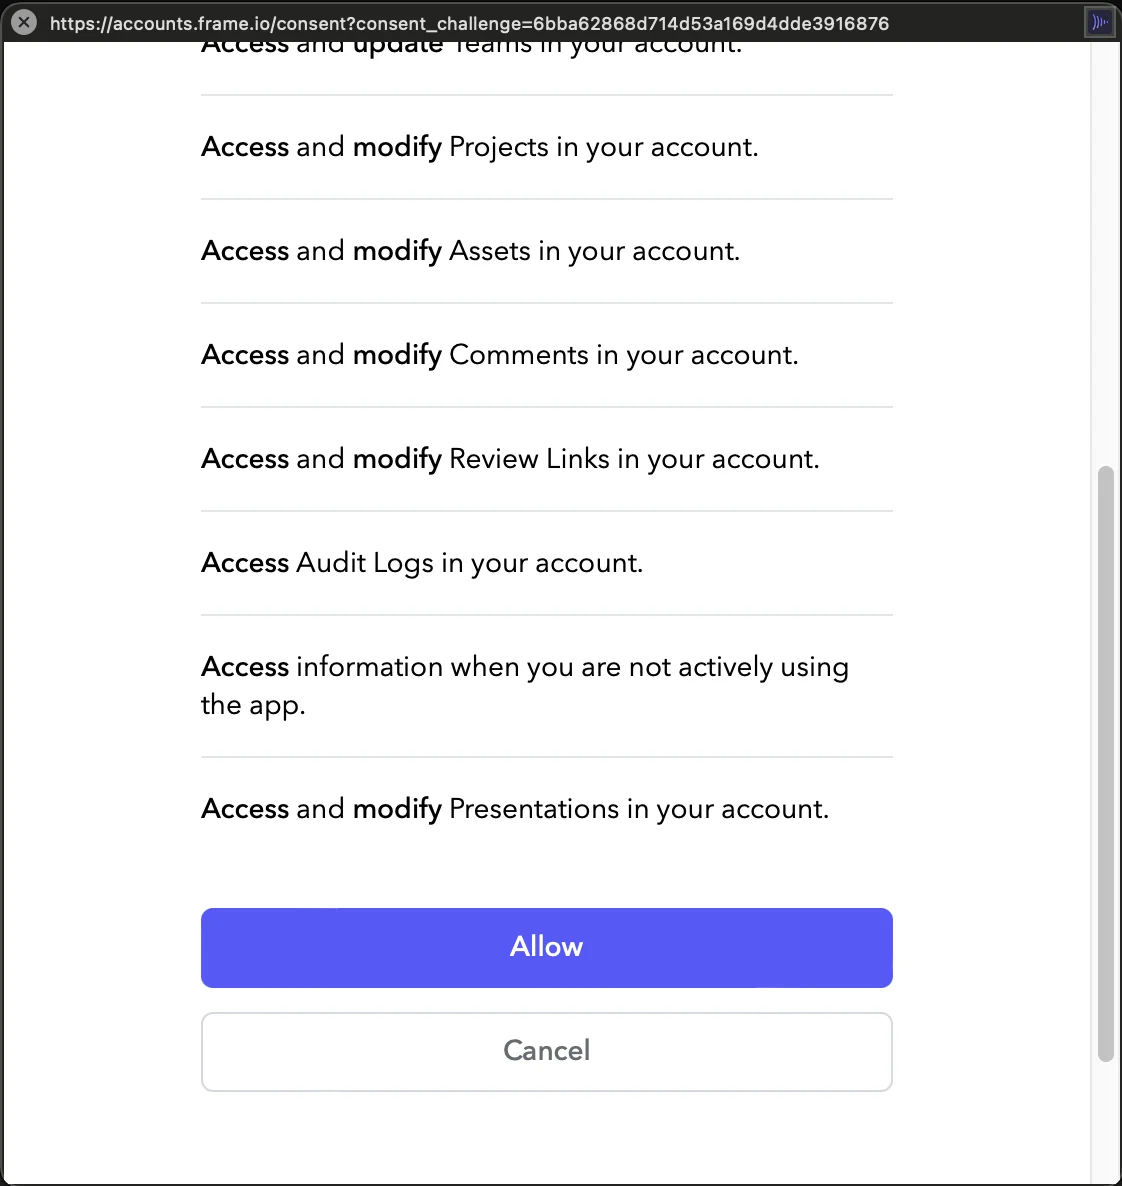
To get started, first log into Frame.io from the Library Tab by selecting “Frame.io” then flip the switch that says ‘Not connected’ to begin the login process.

You will need to provide your login credentials and give ADD the ability to access all files and information from Frame.io
Once you’ve logged in, you will see all of your Frame.io projects represented in folders where you can easily navigate to the project you would like to work on.

One you’ve found your project, you can preview any video by pressing the spacebar, or you can double click the video file, and ADD will download it and place it in the timeline.
💡*By default, ADD imports the 720p file, but you can right click on any file to download higher or lower resolution versions.
Once you’ve finished adding sound to your Frame.io video, you can Upload the video back to Frame.io. To do so, set your IN/Out Points on your project and press ⌘B to Bounce.
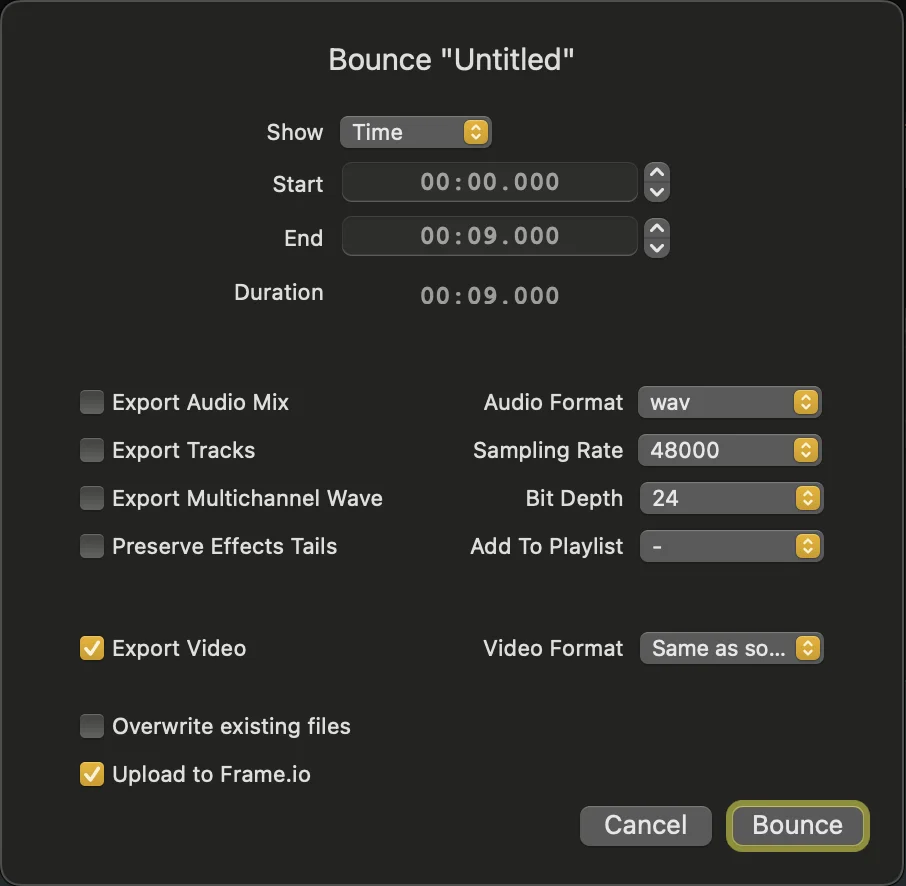
Select “Export Video” and “Upload to Frame.io”. Then click “Bounce” and ADD will upload the video with audio to your Frame.io project stack.
If a stack doesn’t exist yet, ADD will create one. Alternatively, you can Upload your work to the correct Frame.io project by (Right-Clicking) on the project or stack and selecting “Upload to Here.”

A drop-down menu will appear where you can select the file you’d like to upload, and the upload will begin.
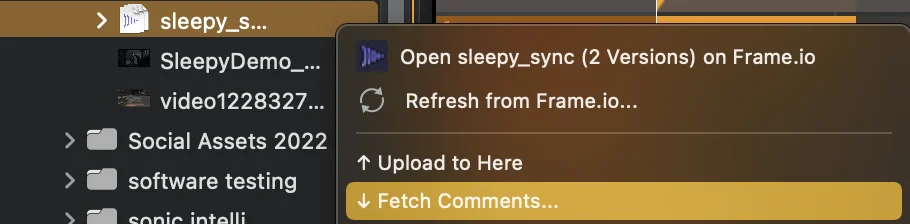
If at any point, you’d like to refresh the comments from your collaborators, (Right-Click) the project and select “Fetch Comments…”. Frame-accurate comments will appear in your timeline.
If you would like to review a project on the Frame.io website, select “Open on Frame.io.” 
You can also open Frame.io in a browser by clicking the Frame.io logo at the top right of the Frame.io window.
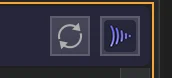
And if you ever need to refresh your Frame.io projects shown in the Frame.io window, click the “Circling Arrows”.